How to Make a Wooden Leather Burnisher (Edge Slicker)
As an Amazon Associate, this website earns from qualifying purchases.
Make a wooden leather burnisher from a hardwood offcut with hand tools. Round the grip, file smooth grooves and fit each one to your own leather scrap.
- Time
- An afternoon, with extra time for fine sanding
- Materials cost
- One hardwood offcut, plus sandpaper if needed
- Level
- first project
- Skill it teaches
- Rasping a rounded grip and filing smooth grooves
Time and cost are bands, not quotes. What you actually pay depends on your timber prices, what your yard stocks, and which tools you already own.
What you need
- Hand saw
- Bench vise with soft jaws, or clamps and scrap packing
- Rasp and round file, both fitted with handles
- Steel rule, square and pencil
- Sanding block and sandpaper
- Dowel or another rounded sanding aid
- Safety glasses and a fine-particle dust mask
Materials
- One sound, bare hardwood offcut, roughly 120 x 20 x 20 mm (about 5 x 3/4 x 3/4 in)
- Sandpaper in 120, 180, 220 and 320 grit
- Leather scraps matching the thicknesses you use
- Optional: plain wax for the grip
Missing something? Check prices on Amazon
Sections10
What you're making
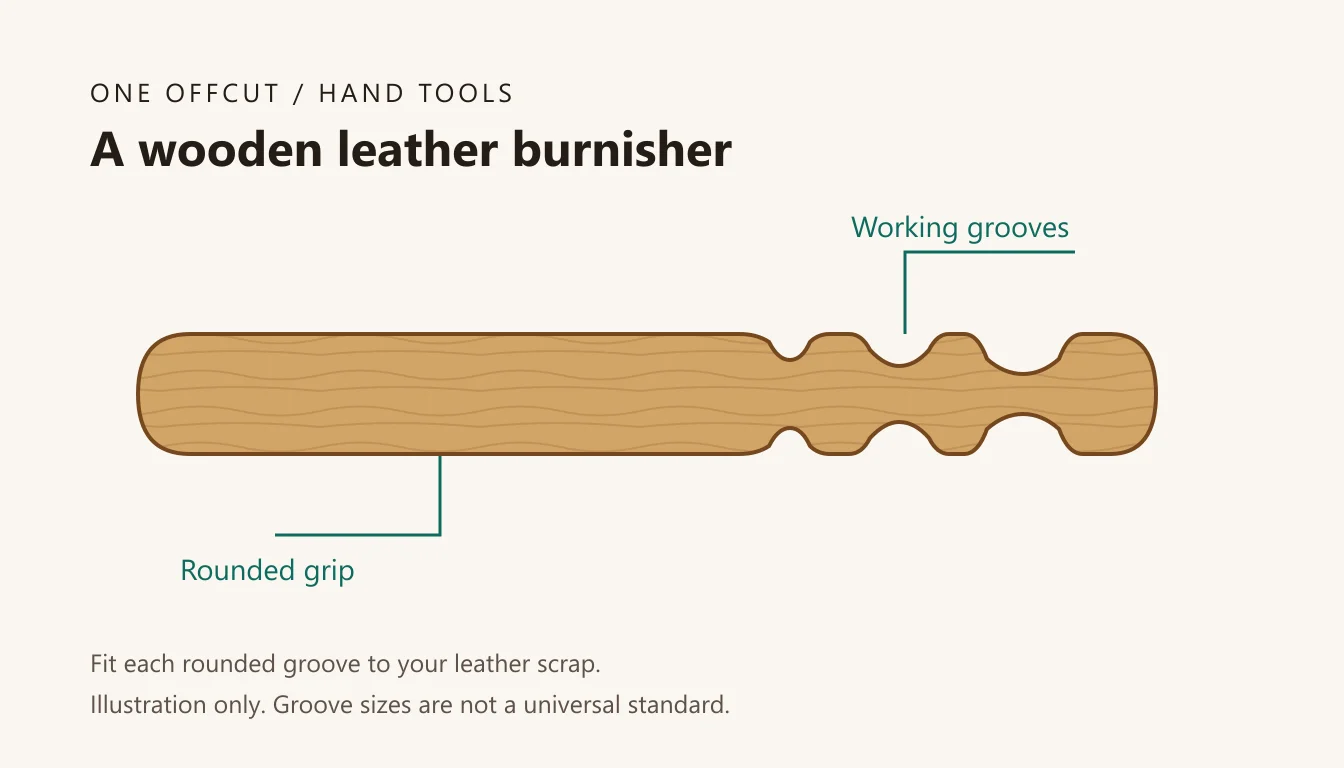
A wooden hand burnisher, also called an edge slicker, is a small rub stick with smooth grooves. Your hand holds the long grip. A groove near the end meets the edge of the leather. This guide shows how to make a wooden leather burnisher from one hardwood offcut, with a saw, rasp and files.
It is a small first project if you want to practise working by hand. There are no joints to fit and no glue to wait for. The main task is to remove wood slowly, then sand away every scratch where the tool will touch leather.
For preparing and finishing the leather itself, use Bob Park's Finishing Edges guide. His step 6 uses a hand burnisher. The build here makes that kind of hand tool; it does not replace his leather process.
What it costs and how long
Allow an afternoon, with extra time if the hardwood is slow to file. That is a planning band, not a timed build. Fine sanding takes patience, even on a small piece.
If you own the tools, the wood can come from your scrap bin. You will also need sandpaper and scraps of the leather you use. Buy a small bare hardwood blank if the history of your offcut is unclear. The hand tools guide covers the basic kit.
Cut list
These are starting sizes to adjust to your hand and your wood. They are not a standard for every burnisher. The inch sizes are rough equivalents; pick one set of units and work from it.
| Part | Qty | Starting size | What to adjust |
|---|---|---|---|
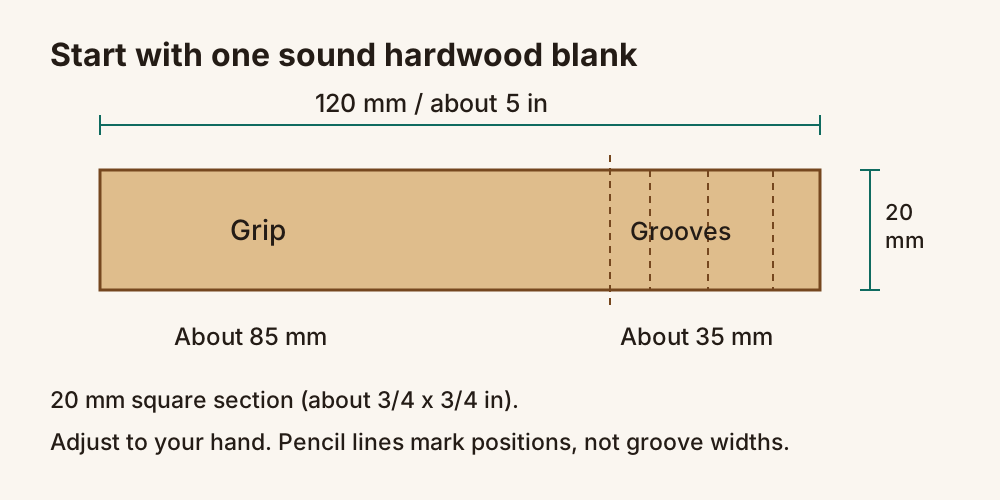
| One-piece blank | 1 | Roughly 120 x 20 x 20 mm (about 5 x 3/4 x 3/4 in) | Leave enough length for a comfortable grip |
| Working end | Part of the blank | Set aside roughly 35 mm (about 1 3/8 in) at one end | Fit two or three grooves with solid wood between them |
| Grip | Rest of the blank | Roughly 85 mm (about 3 3/8 in) before rounding | Round only as far as feels comfortable |
The diagram is a layout example. Groove widths and positions are fitted later, using leather scrap.
Choose the offcut
Use dense, close-grained hardwood such as maple, beech or cherry. A firm surface resists dents, and small pores leave fewer gaps to smooth inside a groove. These are examples, not a ranking of species.
Look for dry, straight-grained wood with no cracks or loose knots. The grain should run along the blank. Reject painted, treated or unknown reclaimed wood. A crack near the working end can leave a sharp lip, so cut back to sound wood or pick another offcut.
Before you start
Secure the wood before each cut, rasp stroke or filing pass. Use soft vise jaws, or clamp it between scrap packing on a solid bench. Keep only the part you are working on beyond the jaws. Move the blank as needed rather than reaching around a clamp.
- Wear eye protection while sawing, filing and sanding.
- Wear a fine-particle dust mask for sanding, and clear dust from the bench.
- Keep your free hand behind the saw and away from the rasp's path.
- Use files and rasps with proper handles. The bare pointed tang can hurt your hand.
- Check the hold after turning the blank. It must not rock or spin under light pressure.
Stop if you cannot hold the short blank firmly with room for the tool. Use a longer offcut, do the rough work while it is still long, then cut to length and smooth the end. The beginner safety guide covers the wider workshop rules.
Making the wooden leather burnisher
Step 1: Mark and cut the blank
Square a line across the offcut at your chosen length. Mark the waste side. Clamp the wood and saw beside the line so the piece you keep stays full length. Leave a little waste to sand off if the end is rough.
Mark a light line around the blank to split the grip from the working end. Pencil in two or three groove positions at that end. Leave solid bands between them and some wood beyond the last groove. At this stage, mark positions only; you have not chosen groove widths.
Step 2: Round the grip and working end
Clamp the blank with one corner facing up. Rasp that corner down with light strokes, then turn the wood and repeat. Four flat faces become eight narrow ones. Keep turning and taking off small amounts until the grip is rounded or slightly oval.
Round the working end too, keeping it thick enough for shallow grooves. Ease both ends so there is no sharp rim. Unclamp it and check the grip in your hand. It should feel firm without a ridge pressing into your palm. Re-clamp before taking off more wood.
Step 3: File the first groove
Practise on spare wood first. Use a small round file to start a shallow channel at a pencil mark. Turn and re-clamp the blank a little at a time, joining the channel around it. Keep the file on the same line so the groove meets itself.
Use light pressure. The groove needs a smooth, rounded bottom, not a sharp V. A saw cut alone leaves a narrow slot with sharp corners, so use the round file to form the curve. Leave plenty of wood beneath it; stop if the end cracks or begins to flex.
Step 4: Fit the groove to leather scrap
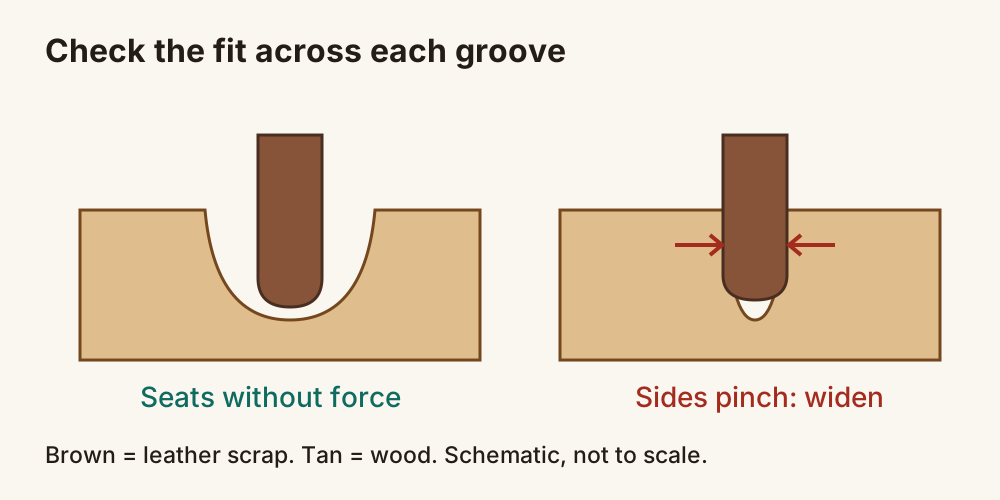
Brush the dust off and try a scrap that matches your leather's thickness. For a glued stack, use a scrap with the same layers. Rest its edge in the groove without forcing it in.
If the sides pinch, file the curve a little wider and check again. A larger round file can help. The edge should sit in the curve and slide freely. Stop before it sinks into a tight slot. A groove that grips both faces needs more work, even if its bottom looks smooth.
Step 5: Add grooves only where needed
Fit a second groove to a thicker scrap if you use one. Add a third only if there is room and you have a use for it. Graduated grooves means each curve fits a different edge thickness. It does not mean that every tool needs the same set of widths.
Keep a solid band of wood between grooves. Round the lips of each band with fine sandpaper so no sharp ridge touches the leather. If two grooves start to merge, stop cutting and use another part of the blank or make a fresh working end.
Sanding the grip and grooves
Start with 120 grit to remove file and rasp marks, then use 180 and 220. Sand along the grain on the grip. Use 320 grit on the working end if fine scratches remain. Each grit should remove the marks from the last one before you move on.
Wrap a strip of sandpaper around a dowel or another rounded aid that fits the groove. Allow for the paper's thickness. Work gently around the curve, turning the blank in the vise as needed. Avoid pulling a loose strip hard across the lips; that can wear away the fit you just made.
Brush off the dust and look at each groove under light from the side. Check for scratches, sharp rims and loose fibres. Run a scrap of cloth through the curve to find snags, then check with leather again. The sanding guide explains grit order if this is new to you.
Finishing it and checking on scrap
Bare, smooth wood is a sensible place to stop. You can put a little plain wax on the grip and buff off the excess if you prefer that feel. Leave the grooves bare for the first check. A glossy coat will not fix a rough groove, and wax can transfer to leather.
Wood finishing and leather edge finishing are separate jobs. Follow Bob Park's leather guide for the leather steps and his advice about the order of products. Do not assume a wax sold for wood suits that process.
Try a few light hand strokes on prepared leather scrap before touching a finished piece. Check for snagging, fresh marks, transferred residue or a groove that wedges the edge. Stop and smooth the wood again if it catches. A neat-looking groove still needs this scrap check.
Where beginners go wrong
Cutting grooves too soon. Round the working end first. Rasping it after the grooves are cut removes their lips unevenly.
Choosing widths from a chart. Leather thickness and stacked layers vary. Fit to the scrap you will actually use.
Pressing harder on a rough patch. Force will not remove a scratch from the wood. Re-clamp the burnisher and sand the patch.
Leaving sanding dust in a groove. Brush it clean before each scrap check so loose grit does not rub against the leather.
Soaking the tool to clean it. Wipe away residue and let it dry. Inspect for raised fibres before using it again.
Make it yours
Keep one groove. If you work with one leather thickness, a single well-fitted curve may be all you need.
Leave an oval grip. Hand filing does not need to produce a perfect cylinder. Stop when the grip feels comfortable.
Label the grip. Pencil marks can identify which groove fits which scrap. Keep marks off the working surfaces.
What to build next
For another small hand-tool build, make a wooden phone stand. It adds careful cuts and a glue-up. Find other uses for your offcuts in the scrap wood projects guide, or follow the free First 5 Projects Roadmap for a set order.
Common questions
What wood should I use for a leather burnisher?
Choose a dense, close-grained hardwood offcut such as maple, beech or cherry. Close grain gives you a surface with fewer open pores to smooth around the grooves. Use dry, bare wood with a known history. Reject cracks, loose knots and treated or coated scrap rather than trying to sand them away.
How wide should the burnisher grooves be?
Fit each groove to a scrap of the leather you plan to use. For layered work, use a scrap with the same layers. Start with a small rounded channel and widen it a little at a time. The edge should sit in the curve and slide without being wedged between the sides.
Do I need a lathe to make an edge slicker?
No. A saw cuts the blank, a rasp rounds the grip, and a round file cuts each groove as you turn the wood in a vise. The grip can stay slightly oval. A smooth surface and a groove that fits your leather matter more than a perfectly round handle.
Should I wax a wooden leather burnisher?
You can leave the whole tool bare. If you want wax on the grip, use a small amount of plain wax and buff off the excess. Keep the working grooves bare for the first scrap check. Wax can transfer; a wood finish label alone does not prove it suits your leather process.
Get the free First 5 Projects Roadmap
Five projects in the order that builds confidence, the tool list split into own / borrow / rent / buy later, and a cut-list worksheet you can print and take to the timber rack.